UPDATE: ARB has released a new version of the tent, keep reading here for my experience with the Simpson II then go HERE to read about the Simpson Series III
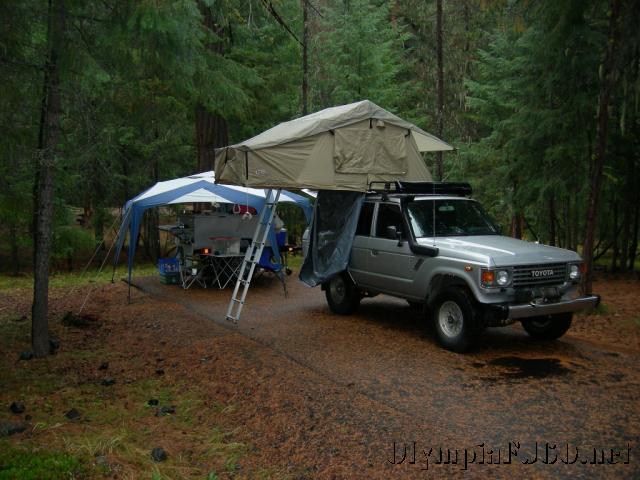
We recently had a chance to get one last weekend of camping in. We were heading east to the Naches River Valley to participate in a Backroad Drivers Northwest tour. This tour was of the Clemen Mountain (ridge) area just east of the Naches River and the town of Nile. The weather called for rain and I didn’t want to sleep on the ground and chance getting flooded out of our tent. Since I have been wanting to try one out I decided to pickup the Simpson Series II Roof Top Tent.

Then tent comes mostly assembled. All that is required is to decide whether you want to orient it to open to the side or to the rear. If you have it open to the rear you can create a nice sheltered area at the tailgate. This way is best suited for full sized SUVs and Trucks. I chose to have it open to the side (passengers for me) as I will be adding the Annex when it comes in off of back order. Once you have decided the orientation, you can bolt on the “mounting extrusions”. All of the parts are tucked way inside the folded up tent so you will need to get them out to continue. These are the parts that will connect the tent to your roof rack. You can use any type of roof rack as long as it meets the load capacity you will be placing on it (tent and occupants). I already had the ARB Touring Rack installed. The tent can also be mounted on factory bars or Yakima and Thule bars. After the mounting extrusion is attached, the ladder is attached using the supplied stainless steel brackets. The ladder has a dual purpose. It is of course the way you get into the tent. The ladder is also the lever you use to open up the tent.
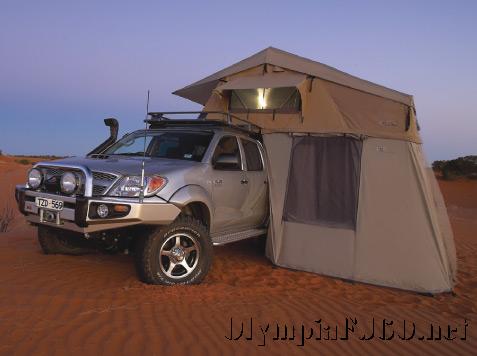
The annex is a nice little addition that creates an indoor changing/storage area under the tent. That is one of the features that drew me to the ARB tent instead of others. The tent has a “vestibule” section that provides a sheltered for the ladder and entrance to the tent. The annex slides into a rail attached to the floor of the tent then zips to the bottom of the tent.
Once assembly is finished, the tent is ready to be mounted onto the rack. This is best done with two or three people. Although it is not particularly heavy the size makes it awkward to handle. The tent comes with stainless steel brackets and bolts and an aluminum runner that slides in the mounting extrusion. This provides limitless spacing between bars.
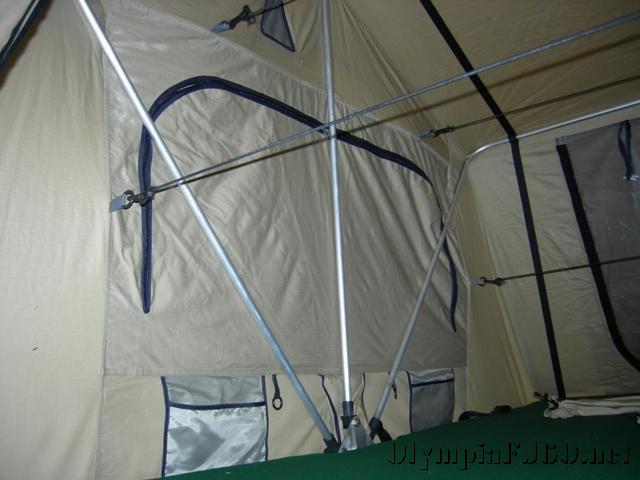
With the tent mounted you are now ready to open it up for the first time. Start by releasing all of the straps that hold the tent closed. Extend the ladder and the locking pins will engage the holes. Pulling on the end of the ladder you should have enough leverage to start to open the tent. Once the tent is just over half way open the weight will shift to pushing down on the ladder. Slowly lower the ladder to the ground making sure the tent opens all the way. Now slide out the overhang supporting bar (U shaped aluminum bar) and insert into the retaining sockets. Make sure the corners of the bar are all the way into the corners of the tent. Get the spring steel rods from inside the tent. These are used to support the outside window awnings and the flysheet. Insert the U shaped end into the eyelet in the awning/flysheet. The other end is inserted into the aluminum base of the tent through the eyelets. Be sure to make note of the angle of the hole and position the rod at this angle to make insertion easier. Remove the 4 bungees. If the bungees were not installed when shipped they will be in one of the parts bags.
Now the annex can be installed. Start by sliding the rope sections into the extrusion at the hinge area of the tent base. Using the zipper attach the remaining three sides. Spread out the floor and stake in to the ground. Install the Annex Floor, making sure to place the rubber mat under the ladder to protect the floor. If you need the ladder extension, be sure to check on the “Well Extension” in order to extend the depth of the floor equal to the ladder extension.
I set it up once in the shop before leaving. My second setup was in the dark during a downpour. Except for forgetting to attach the flysheet, assembly went smoothly and tool only about 15 minutes. Since we were going on a drive the next day I had to take it down again. I think the takedown time, after all the bags were removed, was about 10 minutes. It says you can leave your bedding (except for maybe pillows depending on bedding size) inside the tent when it is folded up. I think I will do that next time. Once I have the annex I will make a short video of the setup.
5 replies on “ARB Simpson Series II Roof Top Tent”
Will the series III annex fit (zip) to the series II tent?
I’ll check on that. I don’t think it does. I’ll also check on the Series II annex availability.
Hi,
do you know if the simpson 2 annex will fit the simpson 3 tent?
I like the idea of the floor in the simpson 2.
Kevin
I will double check.
Hi, Brandon
I’m inheriting one of these bad boys and I can’t seem to find the dimensions of it when it is closed up ANYWHERE. It’s for shipping purposes. And the owner is not in a position to be able to get that for me…You wouldn’t be able to get me that would ya?